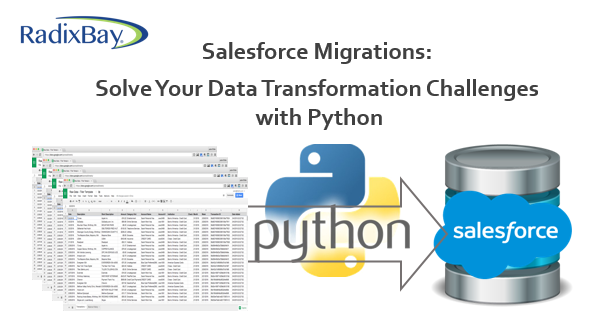
Introduction
Data migrations can be a dreaded part of any Salesforce implementation, but they don’t have to be. Following data migration best practices can help ensure a smooth and less painful experience. A few weeks ago, RadixBay posted an article that reviewed David Masri’s book: Developing Data Migrations and Integrations with Salesforce: Patterns and Best Practices.
The key takeaways I learned from reading David’s book was to automate the data migration process and to handle all data transformations through code. Often, data migrations are handled by getting source files from the client, usually in CSV or XLSX format, then using Salesforce Data Loader to manually load the files into Salesforce.
This method is clunky, introduces manual error, and is time-consuming. It can become even more troublesome when the client wants to migrate large amounts of data, but also wants a short cutover time between the legacy system and the new platform. That is why automating data migrations is so important.
During my first data migration, which involved migrating data from Microsoft Dynamics to Salesforce, I wanted to automate the process using tools I had knowledge of and felt comfortable with. I chose to use the Salesforce Data Loader through the command line and Python.
Salesforce Data Loader is an import/export tool that is free to use and a tool I’ve had plenty of experience using. Python is a popular programming language that is similar to other programming languages I’ve used in the past and was relatively easy to learn. Below is a detailed outline of how I was able to automate data transformations with Python.
Video Tutorial
I also recorded a step-by-step video tutorial. My recommendation is to read this article first to build your foundation of knowledge. It will provide you with the concepts you need to more easily understand the steps I perform in the video.
Enjoy!
Why Python?
A Salesforce data migration is a complicated task that involves moving data from a legacy system into a Salesforce org. Clients provide Salesforce teams with batches of client data that need to be loaded into Salesforce. Before the data can be loaded into Salesforce, teams must analyze, clean, and prep the data..
This process is known as data transformation. Data transformations can be difficult, time-consuming tasks to perform manually in Excel, especially if you encounter the following scenario that I faced:
- The client provided me with over 20 files containing client data that needed to be consolidated.
- 1 of the client data files contained over 1,048,576 records, which is Excel’s maximum row limit.
- Loading the information into Excel resulted in a malformed format of the data (typically occurs when loading CSV files)
- The picklist values in the data were represented as codes and needed to be decoded before loading into Salesforce (this can happen when dealing with data from Microsoft Dynamics).
- Related data from multiple files needed to be merged/joined together.
- I needed to handle missing data in several columns.
Ideally, you should automate the data migration process with an ETL tool instead of performing it manually in Excel. Automating the data migration process will allow you to run one or more test migrations, easily make revisions to the process, and eliminate errors caused by manual work.
When you do not have access to a fancy data migration tool, you are stuck using Salesforce’s Data Loader tool, which lacks complex data transformation options. But do not fret! If you plan on using Data Loader through the command line, which is recommended for automating the loading process, you can use Python to automate your data transformations before you load the data into Salesforce. Below are some of the major benefits you’ll experience when using Python over Excel.
- Python is free to use
- Python handles does a great job handling large sets of data, while Excel tends to crash
- Python runs operations MUCH faster than Excel
- Python can read larger files than Excel
- Python formats the data as expected
You need to have a good understanding of your data so you will know what needs to be automated. As a data migration specialist, you should carefully examine the data before you begin writing any data migration code. You should identify the following:
- Required Data
- Irrelevant Data
- Missing Data
- Duplicate Data
- Field Mappings
- Relationship Mappings
- Necessary Data Transformations
- Order of Migration
Data Transformation Method
We will prep the data using a combination of Python libraries, and we will run our scripts using a batch file. This method is ideal for those who do not have access to an ETL (Extract, Transform, Load) tool. The post will focus on transforming client data so that it will be ready to be loaded into Salesforce.
We will also discuss the helpful Python libraries and code that can be used to analyze, clean, and prep client data. We will also cover creating batch files to run Python scripts automatically.
Install Python
Python is a high-level scripting language that is widely used by data analysts and scientists. It is also easy to learn, which makes it ideal for a Salesforce data migration.
You will need to install Python if you haven’t already. To see if you currently have Python installed on your system, open the terminal and type “python” as shown below . If Python is installed, you will see Python version information listed:

If you do not see the version information listed, you will need to download Python for your system via the Python Downloads page.
Installing Python Libraries
There are many Python libraries that can be used for Salesforce data migrations, including Pandas, NumPy, and Simple Salesforce to name a few. The first task you will need to complete before you can begin building your migration tool in Python is to download the Python libraries mentioned in this post. It is very easy to install the Python libraries. All you need to do is open the terminal and enter the following command:
pip install <package_name>
Below is an example of downloading the Simple Salesforce library:

Once you have installed the libraries, you will need to import them into your code to use them. Below are examples of importing libraries:
import pandas as pd
import numpy as np
from simple-salesforce import Salesforce
Pandas

Image from https://pandas.pydata.org/
Pandas is an open-source library that is used for data manipulation and analysis. This library is a game changer when it comes to analyzing and prepping your data for Salesforce. Here is some vocabulary to get you up to speed on Python/Pandas terminology that will be used in this post:
- DataFrame: A table containing data
- Series: A column in a table
- Tuple: A sequence of values
- Dictionary: An unordered collection of keys and values
Below are some data migration scenarios you can automate using Pandas:
Load Client Data
Before you begin analyzing and transforming your data with Pandas, you must convert the data to a format that Pandas understands. You can use the read_csv method to create Pandas DataFrames with data from a CSV file. With the read_csv method, you are able to load in files that have special delimiters, like a pipe (|), use a Python dictionary to load in specific columns, choose the file encoding, and more. The read_csv method also eliminates those formatting errors you may encounter when loading your data in Excel. Below is an example using read_csv to load account data into a DataFrame:
# Define Folder Paths of Required Tables
folder = Path(“C:/Users/kimsmall/Documents/DataMigration/ClientData”)
accountFile = folder / “AccountTables/AccountBase.csv”
# Load CSV data into DataFrames
accountTable = pd.read_csv( accountFile, encoding=”utf-16″, quotechar='”‘, delimiter=”|”, engine=’python’, usecols=accountCols)
Please note that Python Pandas will allow you to import data in many other formats, including XLSX, SQL, and HTML. View the Input/Output documentation to explore all of the different ways to load data into Pandas DataFrames.
Get the Overall Record Count from a Data Table
You can use the shape attribute to get the total number of rows and columns in a DataFrame. Pandas returns a tuple in the following format: (# of Rows, # of Columns). Let’s say you want to quickly view the number of records in an account table you received from a client. You would enter the following code:
# Get the number of records and columns in the DataFrame
dataShape = accountTable.shape
Which would return a similar tuple as the one below:
(673,10)
This tuple states that there are 673 rows and 10 columns in the accountTable DataFrame.
Get the Counts and Unique Counts of Each Column in a Data Table
Your data analysis should include finding the counts and distinct counts of all values for each column in your data. This will allow you to verify the counts after loading the data into Salesforce to ensure the migration was successful. You can quickly get summary statistics from your data using Pandas methods. Let’s say you have the following account data that you need to analyze:
|
AccountId |
Name |
Phone |
Rating |
AccountSource |
|
ACC6605a6cb |
Red Lobster |
888-120-2505 |
Hot |
|
|
ACC4ba88e0d |
Outback Steakhouse |
|
Hot |
|
|
ACCab8d72a0 |
Olive Garden |
713-852-7295 |
Warm |
|
|
ACC95783b5b |
Ruby Tuesday |
309-720-2961 |
Cold |
|
|
ACC6c8b86b6 |
Longhorn Steakhouse |
|
Warm |
Other |
You can load the account table into a DataFrame, then call both the count and nunique methods on that DataFrame.
# Get the Value Count of Each Column in Account Data
columnValCount = accountTable.count()
# Get Unique Value Count of Each Column in Account Data
uniqueValCount = accountTable.nunique()
The count method will return the counts of values in each column in the accountTable DataFrame:
| AccountId | 5 |
| Name | 5 |
| Phone | 3 |
| Rating | 5 |
| AccountSource | 4 |
The nunique method will return the count of distinct values in each column in the accountTable DataFrame:
| AccountId | 5 |
| Name | 5 |
| Phone | 3 |
| Rating | 3 |
| AccountSource | 3 |
Decode Picklist Values
The data you receive may contain codes for each picklist value instead of their actual values. You will need to replace those codes with their actual values. The replace method is used to replace data in a DataFrame or Series. Let’s say a client provides you with the account data below from their current CRM:
| AccountId | AccountName | Phone | CustomerTypeCode | |
| ACC645ca15e | Wal-Mart | (542) 421-4532 | 1 | nc-store@walmart/.com |
| ACC516fc7fb | Fresh Market | (826) 132-2344 | 3 | mailto:826store@freshm.com |
| ACC76ccea08 | Amazon | (643) 572-2942 | 5 | email@amazon.com |
| ACC09d45f1f | Panera | (345) 503-5324 | 8 | 13923yum@panera.com |
| ACC52504ac7 | Marshalls | (625) 634-7954 | 12 | crafts@@marshalls.com |
The CustomerTypeCode column lists the customer type for each account in a code form. End users will not know what these codes represent, so you will have to decode this column. This is easy to do with the replace method. Define a dictionary for the CustomerTypeCode column, listing codes with their related values. Creating a dictionary to decode picklist values is great because you can easily add, update, and keep track of values.
customerTypeCodes = {
1: “Competitor”,
2: “Consultant”,
3: “Customer”,
4: “Investor”,
5: “Partner”,
6: “Influencer”,
7: “Press”,
8: “Prospect”,
9: “Reseller”,
10: “Supplier”,
11: “Vendor”,
12: “Other”
}
Then, call the replace method on the CustomerTypeCode series in the accountTable DataFrame using the dictionary you created.
# Replace Picklist Values
accountTable[‘CustomerTypeCode’] = accountTable[‘CustomerTypeCode’].replace(customerTypeCodes)
Clean Dirty Data
The Email column from the last example contains dirty data. In its current state, the Email column will cause errors when loading the account data into Salesforce because some of the emails are formatted incorrectly. The replace method has a RegEx parameter that you can use to clean the emails. RegEx, short for regular expression, is a search pattern formed with a sequence of characters.
The replace method without RegEx searches for an exact match in your data, while the replace method with RegEx searches for a partial match in your data. To clean the Email column, you will need to replace certain parts of the email addresses, so you will need to use RegEx. I suggest using Debuggex’s Python Regex Cheatsheet to help you build out regular expressions. Use the following code to clean the Email column:
# Clean email column
accountTable[‘Email’] = accountTable[‘Email’].replace(regex=True,to_replace=r’/.com’,value=r’.com’);
accountTable[‘Email’] = accountTable[‘Email’].replace(regex=True,to_replace=r’@@’,value=’@’);
accountTable[‘Email’] = accountTable[‘Email’].replace(regex=True,to_replace=r’^mailto:’,value=r”);
Which will return the following table:
| AccountId | AccountName | Phone | CustomerTypeCode | |
| ACC645ca15e | Wal-Mart | (542) 421-4532 | Competitor | nc-store@walmart.com |
| ACC516fc7fb | Fresh Market | (826) 132-2344 | Customer | 826store@freshm.com |
| ACC76ccea08 | Amazon | (643) 572-2942 | Partner | email@amazon.com |
| ACC09d45f1f | Panera | (345) 503-5324 | Prospect | 13923yum@panera.com |
| ACC52504ac7 | Marshalls | (625) 634-7954 | Other | crafts@marshalls.com |
Handle Missing Column Values
You may receive tables from a client that are missing data in required fields. For example, let’s say a client gives you the following lead table:
| LeadId | FirstName | LastName | Company | |
| LDS928f5db | Cindra | Bostick | cbostick0@healthmed.com | |
| LDS5c2e82cd | Tani | tbillitteri2@abello.com | ALK-Abello, Inc. | |
| LDSc25fca0c | Crysta | Gellett | cgellett3@zep.org | Zep Inc. |
| LDS0d07ad56 | Ethel | Very | every1@europa.org | |
| LDS86841295 | Rahel | Heigold | rheigold4@harkins.edu | H.J. Harkins Company, Inc. |
| LDSb46f2312 | Corette | cjindracek5@handp.com | H and P Industries, Inc. |
The LastName and Company fields have missing values. However, the Last Name and Company fields in Salesforce are required fields. If you try to load the data in as is, you will receive an error on the records that are missing the required information. You can use the fillna method to add placeholder values to the missing data.
# Handle missing data
leadTable[‘LastName’] = leadTable[‘LastName’].fillna(‘Missing Last Name’)
leadTable[‘Company’] = leadTable[‘Company’].fillna(‘Missing Company Name’)
The following table will display:
| LeadId | FirstName | LastName | Company | |
| LDS1928f5db | Cindra | Bostick | cbostick0@healthmed.com | Missing Company Name |
| LDS5c2e82cd | Tani | Missing Last Name | tbillitteri2@abello.com | ALK-Abello, Inc. |
| LDSc25fca0c | Crysta | Gellett | cgellett3@zep.org | Zep Inc. |
| LDS0d07ad56 | Ethel | Very | every1@europa.org | Missing Company Name |
| LDS86841295 | Rahel | Heigold | rheigold4@harkins.edu | H.J. Harkins Company, Inc. |
| LDSb46f2312 | Corette | Missing Last Name | cjindracek5@handp.com | H and P Industries, Inc. |
Pull in Data from Related Tables
The merge function will allow you to perform operations similar to a vlookup in Excel or a join in SQL. Let’s say you need to load the following account table into Salesforce:
| AccountId | AccountName |
| ACC645ca15e | Wal-Mart |
| ACC516fc7fb | Fresh Market |
| ACC76ccea08 | Amazon |
| ACC09d45f1f | Panera |
| ACC52504ac7 | Marshalls |
The client also wants you to load the addresses for each account. However, the address information for each account is stored in a separate table:
| AccountId | Street | City | State | Country |
| ACC516fc7fb | 89 Morrow Junction | Pueblo | CO | US |
| ACC52504ac7 | 6601 Fairview Park | Las Vegas | NV | US |
| ACC09d45f1f | 400 Fieldstone Crossing | San Diego | CA | US |
| ACC645ca15e | 8062 Wayridge Park | Tampa | FL | US |
| ACC76ccea08 | 1842 Blackbird Hill | Saint Petersburg | FL | US |
In order to map the addresses to each account, you will have to use the merge function. First, you will need to import both tables into Python Pandas DataFrames. Then, you can merge in the addresses using the following code:
# Merge in address information
accountTable = accountTable.merge(addressTable, how=’left’, on=’AccountId’)
Which will return the following table:
| AccountId | Name | Street | City | State | Country |
| ACC645ca15e | Wal-Mart | 8062 Wayridge Park | Tampa | FL | US |
| ACC516fc7fb | Fresh Market | 89 Morrow Junction | Pueblo | CO | US |
| ACC76ccea08 | Amazon | 1842 Blackbird Hill | Saint Petersburg | FL | US |
| ACC09d45f1f | Panera | 400 Fieldstone Crossing | San Diego | CA | US |
| ACC52504ac7 | Marshalls | 6601 Fairview Park | Las Vegas | NV | US |
Format ‘Date’ and ‘Date Time’ Values
If you plan on loading the data into Salesforce using CSV files, you will need to format the ‘date’ and ‘date time’ values using a Data Loader acceptable format. You can find a list of acceptable formats on Salesforce’s CSV ‘Date’ and ‘Date Time’ format in Data Loader and API knowledge article. Let’s say you have to load the following opportunity table:
| OpportunityId | Name | CloseDate | Stage |
| OPPeaa52c5f | Wal-Mart Opportunity | 2/16/2020 4:00 PM | Prospecting |
| OPPc7733128 | Fresh Market Opportunity | 11/9/2019 11:00 PM | Qualification |
| OPPdad40643 | Amazon Opportunity | 5/30/2018 2:00 PM | Closed Won |
| OPPa44dd409 | Panera Opportunity | 1/8/2019 10:00 AM | Closed Won |
| OPP1feb6c82 | Marshalls Opportunity | 8/22/2020 12:00 AM | Prospecting |
The CloseDate field is listed as an unacceptable format for Data Loader. Iif you try to load the opportunity data as is, you will receive errors. Pandas has a to_datetime method that will allow you to format the CloseDate column.
# Formate Close Date Column
oppTable[‘CloseDate’] = pd.to_datetime(oppTable[‘CloseDate’])
The to_datetime method will automatically convert the CloseDate field into a Data Loader acceptable format, as you can see below:
| OpportunityId | Name | CloseDate | Stage |
| OPPeaa52c5f | Wal-Mart Opportunity | 2020-02-16 16:00:00 | Prospecting |
| OPPc7733128 | Fresh Market Opportunity | 2019-11-09 23:00:00 | Qualification |
| OPPdad40643 | Amazon Opportunity | 2018-05-30 14:00:00 | Closed Won |
| OPPa44dd409 | Panera Opportunity | 2019-01-08 10:00:00 | Closed Won |
| OPP1feb6c82 | Marshalls Opportunity | 2020-08-22 00:00:00 | Prospecting |
Please note that if you open this CSV file in Excel, the CloseDate column will appear to have the wrong format. However, if you were to open the CSV file in Notepad, the correct format will display. Data loader will use the format that is listed in Notepad. So, don’t worry about the formatting in Excel, as Excel tends to auto-format columns after opening the file.
Rename Columns to Match Salesforce API Field Names
In most cases, the column headers from the data the client provides will not match the Salesforce API field names. Ideally, you should update the headers to match those Salesforce API names so that it will be easier to define the field mappings for Data Loader. The rename method will allow you to easily rename your column headers. Create a Python dictionary with the current column names mapped to the updated column names.
accountTableFields = {
“AccountId” : “External_ID__c”,
“Name” : “Name”,
“Phone” : “Phone”,
“CustomerTypeCode” : “Customer_Type__c”,
“Email” : “Account_Email__c”
}
Use that dictionary in the rename method.
# Rename account columns
accountTable = accountTable.rename(columns=accountTableFields)
This will change the column headers from [‘AccountId’, ‘Name’, ‘Phone’, ‘CustomerTypeCode’, ‘Email’] to [‘External_ID__c’, ‘Name’, ‘Phone’, ‘Customer_Type__c’, ‘Account_Email__c’].
Export Transformed Data
Once you have finished transforming your data, you will want to export the results. You can export your transformed data using the to_csv() method. This method will write your DataFrame to a CSV file. Just call the to_csv() method on a DataFrame, and add a few parameters:
# Define the desired path for the results
folder = Path(“C:/Users/kimsmall/Documents/DataMigration/ClientData”)accountResults = folder / “AccountData/AccountResults.csv”
# Pass in the defined path, and a few parameters to remove the index and NaN values
accountTable.to_csv(accountResults, na_rep=””, index=False)
You can also include parameters for file encoding, delimiters and more. Please note that if you would like to export to an Excel, SQL, or JSON format, you have the option to do so.
Simple Salesforce

Image from https://github.com/simple-salesforce
I discovered the Simple Salesforce library after I completed my first data migration, but I wish I would have found it sooner! Simple Salesforce is a REST API client that allows you to write queries in Salesforce Object Query Language (SOQL), insert records… There are numerous features to choose from. What’s even better is that you can use this in combination with Pandas! Below are some scenarios you can automate using Simple Salesforce.
Access the Salesforce Org
Before you can use Simple Salesforce, you will have to login to the Salesforce org that you plan on performing the migration in. You have the option to log in to a Salesforce production org, or you can log in to a Salesforce sandbox. Use the following code to log in using your own Salesforce credentials:
# Connect to a Salesforce Sandbox
sf = Salesforce(username='<INSERT_USERNAME>’, password='<INSERT_PASSWORD>’, security_token='<INSERT_SECURITY_TOKEN>’, domain=’test’)
# Connect to a Salesforce Production Org
sf = Salesforce(username='<INSERT_USERNAME>’, password='<INSERT_PASSWORD>’, security_token='<INSERT_SECURITY_TOKEN>’)
Query Record Ids with Their Related External Ids
Let’s say that you need to load the following tasks into Salesforce:
| External_ID__c | WhatId | OwnerId | Subject | StartDate | EndDate |
| TSK5c476 | ACC1bd3c | USR3e393 | 1/10/19 | 12/9/10 | |
| TSKe4941 | OPP0e1ea | USRe26c7 | Call | 7/13/11 | 12/13/10 |
| TSKb2bcf | ACC2c069 | USRcd6d4 | Send Letter | 10/7/16 | 12/5/10 |
| TSK8662d | CRT26fc7 | USR1982e | Call | 10/18/12 | 12/12/10 |
| TSKaf874 | ACC218cc | USR03673 | Call | 11/7/15 | 12/8/10 |
| TSK1a66b | OPPc1e08 | USRafe7b | Send Quote | 1/1/14 | 12/2/10 |
If you take a look the WhatId field, you will notice that there are external ids for accounts, opportunities, and contracts listed in this column. The WhatId field is a polymorphic field, which means that this field can be used to relate multiple objects to a task record. This also means that you are unable to map related (WhatId) objects to a task record using an external id.
To remedy this issue, you will need to get a list of the Salesforce ids and external ids from the account, opportunity, and contract objects. Instead of performing multiple exports of the data, you can simply query these fields from each object using Simple Salesforce! Create a Pandas DataFrame to hold the query results, then write a SOQL statement to pull in the necessary fields.
accounts = pd.DataFrame(sf.query(“SELECT Id, External_ID__c FROM Account”)[‘records’])
opps = pd.DataFrame(sf.query(“SELECT Id, External_ID__c FROM Opportunity”)[‘records’])
contracts = pd.DataFrame(sf.query(“SELECT Id, External_ID__c FROM Contract”)[‘records’])
Once you get the Salesforce ids along with their external ids, you can merge in each of the Salesforce ids on the task table.
# Merge in Salesforce Ids for WhatId Objects
taskTable = taskTable.merge(accounts, how=’left’, on=’External_ID__c’)
taskTable = taskTable.merge(opps, how=’left’, on=’External_ID__c’)
taskTable = taskTable.merge(contracts, how=’left’, on=’External_ID__c’)
From there, you can write additional code to place all of the WhatIds into a single column, or you can batch the tasks up by WhatId and load them in batches into Salesforce separately.
Create Placeholder Records in Salesforce
Here’s another scenario. A client provides you with some contact data that needs to be loaded into Salesforce. However, you notice that some of those contacts are missing a RelatedAccountId. If you try loading those “orphan” contacts into Salesforce, their default sharing setting will be private. You will need to relate these contacts to a placeholder account before your load them into Salesforce. You can create placeholder accounts using Simple Salesforce.
# Create a Placeholder Account
sf.Account.create({‘Name’:’Placeholder Account’,’External_ID__c’:’PHA00000′})
Once the placeholder account is created, you can use the Pandas fillna method to insert the external id of the placeholder account in the RelatedAccountId column for any contacts without an account.
# Assign Contacts that aren’t related to an account to a placeholder account
contactTable[‘RelatedAccountId’] = contactTable[‘RelatedAccountId’].fillna(‘PHA00000’)
NumPy
NumPy, which stands for Numerical Python, is a Python library that is used to perform mathematical computations. You probably won’t need to compute anything before loading the data into Salesforce, but you may need to break your data into small chunks so you can view it. As previously stated, Excel has a row limit of 1,048,576 rows. If you have files that contain more than 1,048,576 records, you will have problems viewing them in Excel. Not to mention that Excel typically takes a while to load large files.
Break Data into Chunks
For example, let’s say you have an CSV file that has contains over 1,500,000 activity records. Of course, you will not be able to open this file in Excel, but you can break it into chunks with NumPy! You’ll want to convert the original file to a Pandas DataFrame, use NumPy’s array_split() method to split the data, then export each of the batches into Excel files.
# Define Folder Paths for Required Files
folder = Path(“C:/Users/kimsmall/Documents/ClientData/ActivityData”)
activityFile = folder / “ActivityBase.csv”
activityBatch1 = folder / “ActivityBatch1.xlsx”
activityBatch2 = folder / “ActivityBatch2.xlsx”
activityBatch3 = folder / “ActivityBatch3.xlsx”
activityBatch4 = folder / “ActivityBatch4.xlsx”
# Load CSV Data into DataFrames
activityTable = activityTable.read_csv()
# Break the activity table into batches
activityBatches = np.array_split(activityTable, 4)
# Export each batch into its own Excel file
activityBatches[0].toExcel(activityBatch1, na_rep=””, index=False)
activityBatches[1].toExcel(activityBatch1, na_rep=””, index=False)
activityBatches[2].toExcel(activityBatch1, na_rep=””, index=False)
activityBatches[3].toExcel(activityBatch1, na_rep=””, index=False)
The code above splits the activity data into 4 DataFrames. Those DataFrames go into an array, and you can pull each DataFrame from the array.
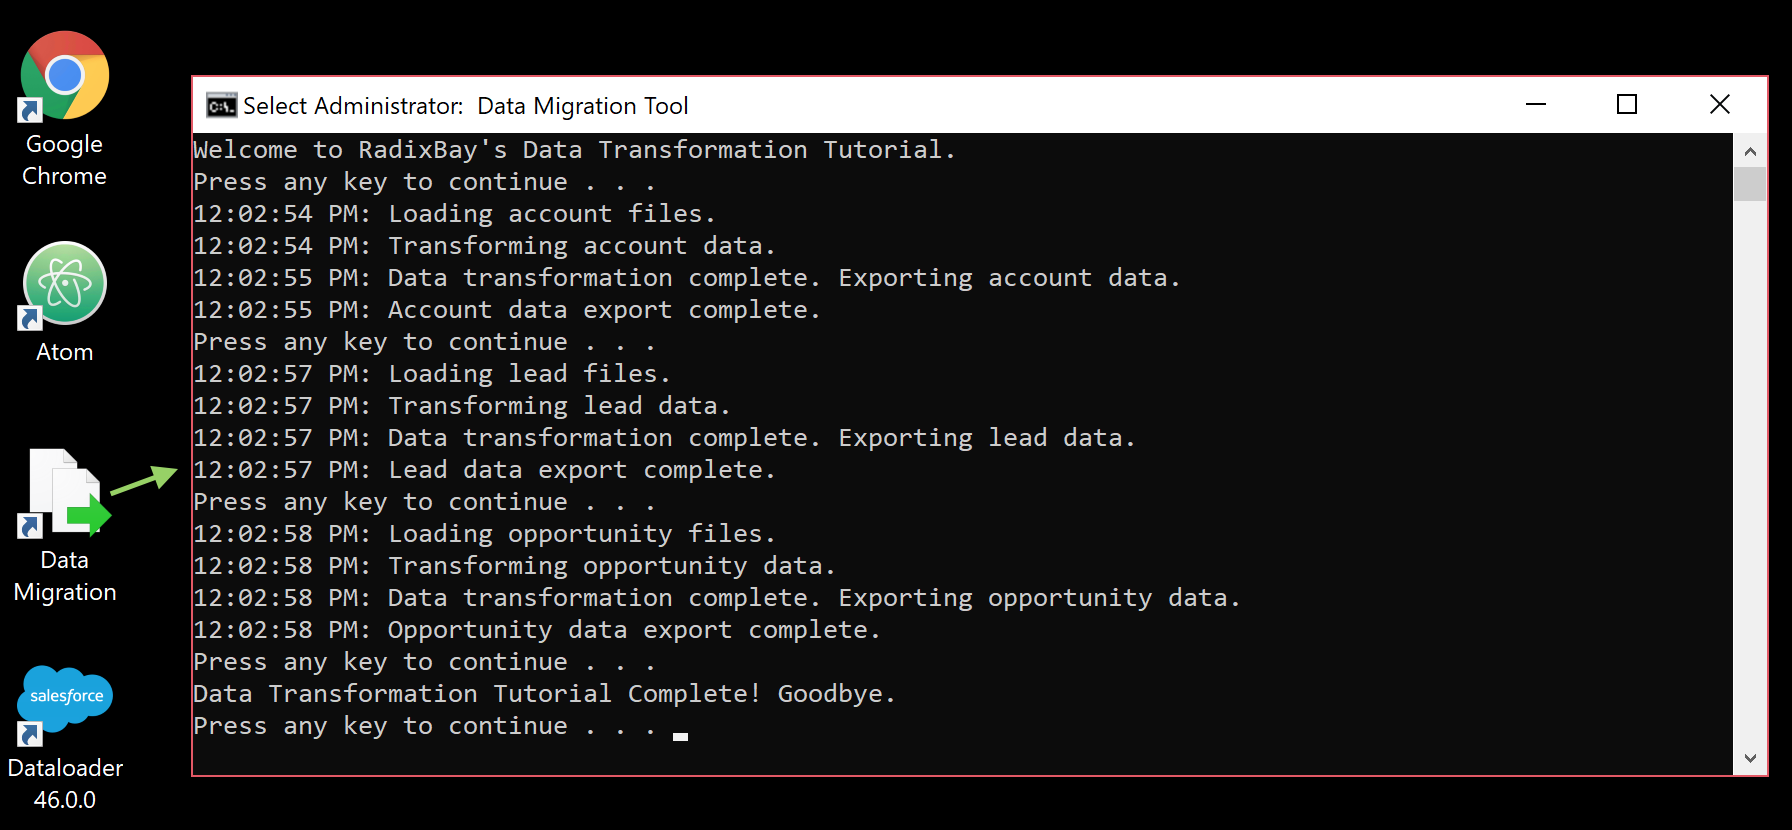
Batch Files for Automation
In order to fully automate your Python scripts, you will need to add them into a batch file. Batch files allow you to automate everyday tasks, and in this case, Salesforce data migrations! First, you will need to create a text file in the text editor of your choice. Next, you will add commands that will call each of your Python transformation scripts in that text file. Python scripts can be called using the following syntax:
python <Location_of_Python_Script>
In this example, we will transform account data, opportunity, and task data using a single batch file:
@ECHO OFF
title Data Migration Tool
ECHO Welcome to RadixBay’s Data Transformation Tutorial.
pause
:AccountPrep
python C:\Users\kimsmall\Documents\DataMigration\Accounts\AccountDataPrep.py
pause
:LeadPrep
python C:\Users\kimsmall\Documents\DataMigration\Leads\LeadDataPrep.py
pause
:OppPrep
python C:\Users\kimsmall\Documents\DataMigration\Opportunities\OppDataPrep.py
pause
:End
ECHO Data Transformation Tutorial Complete! Goodbye.
pause
A title, some labels, and text have been included to the batch file for readability. There are also a few pauses in the batch file so that once a script finishes running, the batch file will wait until you tell it to go to the next script. This is ideal when you need to correct errors in your script code.
You should also try printing some helpful progress information to the console from your Python scripts so that you will know what is going on as the scripts are running. Once your file is ready, be sure to save it as a .BAT file. You can also save a shortcut to the batch file on your desktop for quick access. Double click on the batch file to run it:
Conclusion
I hope this article provided a thorough introduction to automating data transformations with Python. You can try automating transformations yourself in one of your Trailhead or Developer Edition orgs before you take on your next migration!
I recommend diving into Python and finding out more ways to make your Salesforce data migrations easier. In a later post, we will discuss automating the actual data loading process using Salesforce Data Loader.
Helpful Resources

I hope you enjoyed my article on using Python for Salesforce data transformation.
To learn more about our Salesforce services and how RadixBay can help, please visit our RadixBay Salesforce Center of Excellence.
Kimberly Small
RadixBay Salesforce Consultant
Salesforce Certified Platform Developer I
Salesforce Certified Platform App Builder